
There’s something magical about the sweet, nutty aroma that wafts through the kitchen as I prepare my favorite treat: 4-Ingredient Chewy Chocolate Oat Cookies. With just four simple ingredients, I can whip up a batch that’s both gluten-free and satisfyingly delicious, perfect for any snack craving. These cookies seamlessly blend chewy and crispy textures, making them a delightful option for busy days when I crave something homemade without spending hours in the kitchen. Plus, they’re great for a healthier indulgence, cutting back on refined sugars without skimping on flavor. Ready to transform your snack game? Let’s dive into the easy steps for creating these irresistible cookies!
Why are these cookies a must-try?
Simplicity at its Finest: With just four ingredients, these chewy chocolate oat cookies come together in minutes, making them perfect for any busy baker.
Health-Conscious Indulgence: They offer a delightful treat without guilt—gluten-free and lower in refined sugars, these cookies are a win-win.
Texture Play: Choose your adventure—enjoy chewy or crispy textures based on your preference, and impress your loved ones every time.
Versatile Recipes: Swap in sunflower seed butter for a nut-free version, or mix in chocolate chips for an extra treat. If you love flavorful dishes, check out my Garlic Butter Chicken for more cooking inspiration!
Crowd-Pleasing Goodness: Whether for snack time at home or a quick plate at the next gathering, everyone will love these cookies. They’re the perfect blend of fun and flavor, making snack time exciting!
Chocolate Oat Cookies Ingredients
• A few simple ingredients stand between you and these delightful treats!
For the Base
- Oats – Provides structure and a wholesome base; opt for gluten-free oats if needed.
- Peanut Butter – Adds creaminess and natural sweetness; substitute with almond or sunflower seed butter for nut-free diets.
For Sweetening
- Maple Syrup – Acts as a sweetener and binding agent; honey is a great alternative if you’re not vegan.
For Chocolate Flavor
- Cocoa Powder – Contributes rich chocolate flavor and color; consider using carob powder for a caffeine-free twist!
These four ingredients come together to create the magic of Chocolate Oat Cookies, making your snack cravings a thing of delight!
Step‑by‑Step Instructions for 4-Ingredient Chewy Chocolate Oat Cookies
Step 1: Mix the Dry Ingredients
In a large mixing bowl, combine 1 cup of oats and 1/3 cup of cocoa powder. Stir them together thoroughly until they are well blended and no streaks remain visible. This step ensures that your cookies, filled with rich chocolate flavor, have a uniform texture. Set the bowl aside while you prepare the wet ingredients for your 4-Ingredient Chewy Chocolate Oat Cookies.
Step 2: Combine the Wet Ingredients
In a separate bowl, mix together 1/2 cup of peanut butter and 1/4 cup of maple syrup using a spatula. Blend until smooth and creamy, ensuring that the peanut butter is fully incorporated with the syrup. This mixture acts as a sweet and binding agent, creating the foundation for your chewy cookies. Once smooth, move on to the next step.
Step 3: Form the Dough
Pour the wet ingredient mixture into the dry ingredients bowl. Stir well until a cohesive dough forms, resembling a thick batter; it should hold together and be slightly sticky. If the dough feels too wet, you can add a bit more oats to adjust the consistency. That’s your cue that you’re ready to proceed to the next exciting step in creating your cookies!
Step 4: Shape the Cookies
Using your hands, scoop out tablespoon-sized portions of dough and roll them into balls. Place each ball on a baking sheet lined with parchment paper, spacing them about 2 inches apart to allow for spreading. This is where the magic of the 4-Ingredient Chewy Chocolate Oat Cookies begins to take shape!
Step 5: Flatten the Cookies
Once all the dough is portioned out, gently flatten each ball with your palm. Aim for a thickness of about 1/2 inch to help achieve that delightful chewy center while still keeping a slightly crispy edge. This step is crucial for the perfect texture; ensuring an even surface will help your cookies bake uniformly.
Step 6: Bake the Cookies
Preheat your oven to 350°F (175°C) and bake the cookies for 10-12 minutes. Keep an eye on them; they should be set around the edges and just starting to crack on top. This is the perfect moment to take them out for those irresistible chewy cookies!
Step 7: Cool the Cookies
After baking, allow the cookies to cool on the baking sheet for about 5 minutes. This lets them firm up slightly for easier handling. Once they’re cool enough to touch, transfer them gently to a wire rack to cool completely. Your delicious 4-Ingredient Chewy Chocolate Oat Cookies are nearly ready to enjoy!
Expert Tips for 4-Ingredient Chewy Chocolate Oat Cookies
-
Baking Time Awareness: Don’t over-bake your cookies; for that perfect chewy texture, remove them just as they start to crack on top.
-
Oats Consistency: Ensure your oats are finely processed if you prefer a smoother cookie texture. This small step can elevate your 4-ingredient cookies!
-
Dough Adjustments: If your dough feels too wet when mixed, add a bit more oats for balance. This will help the cookies hold together beautifully.
-
Ingredient Temperature: For easier mixing, ensure your peanut butter is at room temperature. This helps create a smoother dough for your tasty cookies.
-
Personalize Flavors: Feel free to mix in chocolate chips or dried fruits to customize your cookies. Spice it up with cinnamon for extra warmth!
How to Store and Freeze Chocolate Oat Cookies
Room Temperature: Store the cookies in an airtight container at room temperature for up to 5 days to maintain freshness and flavor.
Fridge: For longer storage, you can keep them in the fridge for up to one week. Just make sure they’re well-sealed to prevent drying out.
Freezer: Freeze cookies in a single layer on a baking sheet for 1-2 hours, then transfer them to a freezer-safe bag or container, where they’ll stay fresh for up to 3 months.
Reheating: To enjoy your chocolate oat cookies warm again, microwave them for 10-15 seconds or let them come to room temperature before serving.
Chocolate Oat Cookies Variations & Substitutions
Get ready to elevate your baking experience with delightful twists that will surprise and satisfy your taste buds!
-
Nut-Free Option: Swap peanut butter for sunflower seed butter to cater to nut allergies without compromising flavor.
-
Crispier Cookies: Increase baking time to 15 minutes for a crispier finish that adds a satisfying crunch in every bite.
-
Vegan Sweetener: Use agave syrup in place of maple syrup to keep it vegan while maintaining that delicious sweetness.
-
Flavor Boost: Add a teaspoon of vanilla extract to the wet ingredients for a rich, aromatic enhancement that complements the chocolate beautifully.
-
Texture Addition: Mix in dark chocolate chips or chopped dried fruits like cranberries or apricots for added texture and a burst of flavor.
-
Cocoa-Free Version: Try substituting cocoa powder with carob powder for a unique, caffeine-free treat that still satisfies your chocolate cravings.
-
Spiced Surprise: Toss in a dash of cinnamon or nutmeg into the dry ingredients for a warm, cozy twist that elevates your cookies to a whole new level.
-
Craving Some Heat? For adventurous palates, a pinch of cayenne pepper in the dough can provide a surprising kick that pairs well with chocolate.
For even more delicious recipes, don’t hesitate to explore my Garlic Butter Baked Cod or indulge in some savory Garlic Butter Chicken. Enjoy the journey of customization and let your creativity shine!
Make Ahead Options
These 4-Ingredient Chewy Chocolate Oat Cookies are perfect for busy home cooks looking to save time! You can prepare the cookie dough up to 24 hours in advance; simply combine the dry ingredients and the wet ingredients, mix them together, and cover the bowl tightly with plastic wrap to prevent drying out. Alternatively, you can shape the cookies into balls and refrigerate them for up to 3 days before baking. When you’re ready to enjoy these delicious treats, simply bake them straight from the fridge, adjusting the baking time by a couple of minutes if needed. This prep-ahead approach ensures that you always have a delightful snack on hand, just as delicious with minimal effort!
What to Serve with 4-Ingredient Chewy Chocolate Oat Cookies
There’s something special about creating a complete meal experience around these delicious little treats that will have your taste buds dancing with joy.
- Plant-Based Milk: A glass of almond or oat milk enhances the chocolaty goodness and creates a balanced snack that’s creamy and satisfying.
- Fresh Berries: Sweet, juicy strawberries or tart blueberries add a burst of freshness that perfectly complements the rich chocolate flavor.
A delightful medley brings together textures and flavors! Combining the heartiness of cookies with the brightness of fresh fruit creates a refreshing contrast that you won’t forget.
- Vanilla Ice Cream: The creamy richness of vanilla ice cream pairs perfectly with the chewy cookies, offering a delightful dessert experience.
- Chia Seed Pudding: This light, nutritious treat provides a smooth contrast, and its subtle vanilla flavor works well with the cookies’ rich cocoa.
- Nutty Granola: A sprinkle of crunchy granola brings in texture and adds a fun, slightly sweet note to your snacking experience.
Try pairing these cookies with a warm cup of herbal tea or coffee for an afternoon break—each sip complements the fluffy bites, making your moment truly special.
Chocolate Oat Cookies Recipe FAQs
How do I know if my oats are gluten-free?
Absolutely! When selecting oats for gluten-free recipes, look for labels that specifically state “gluten-free.” This ensures no cross-contamination has occurred during processing. Even within the gluten-free category, check for dark spots all over, which can indicate spoilage or contamination.
How should I store leftover cookies?
Very simply! You can keep the cookies in an airtight container at room temperature for about 5 days. If you want them to last a bit longer, store them in the fridge for up to one week. Just ensure the container is sealed tight to prevent them from drying out.
Can I freeze these cookies?
Absolutely! To freeze your chocolate oat cookies, first lay them in a single layer on a baking sheet and freeze for about 1-2 hours until solid. Then, transfer them to a freezer-safe bag or container, labeling them with the date. They will stay fresh for up to 3 months. When you’re ready to enjoy them, just let them thaw in the fridge overnight or microwave briefly!
What can I do if my cookie dough is too sticky?
If you find your dough is too wet and sticky to handle, don’t worry! Simply add a tablespoon of oats at a time until you achieve a workable consistency. This adjustment will help your cookies hold together beautifully while baking, ensuring they come out chewy and delicious.
Are there any allergy considerations with these cookies?
Yes, absolutely! Since these cookies contain peanut butter, they are not suitable for anyone with a peanut allergy. However, you can easily swap in sunflower seed butter for a nut-free option. Just be mindful of those with allergies when serving!
What texture should I expect from the cookies?
You’ll love this question! When they come out of the oven, the edges will be slightly crispy while the center remains wonderfully chewy. This delightful contrast is what makes these chocolate oat cookies so satisfying and rich. Perfect for snack time!

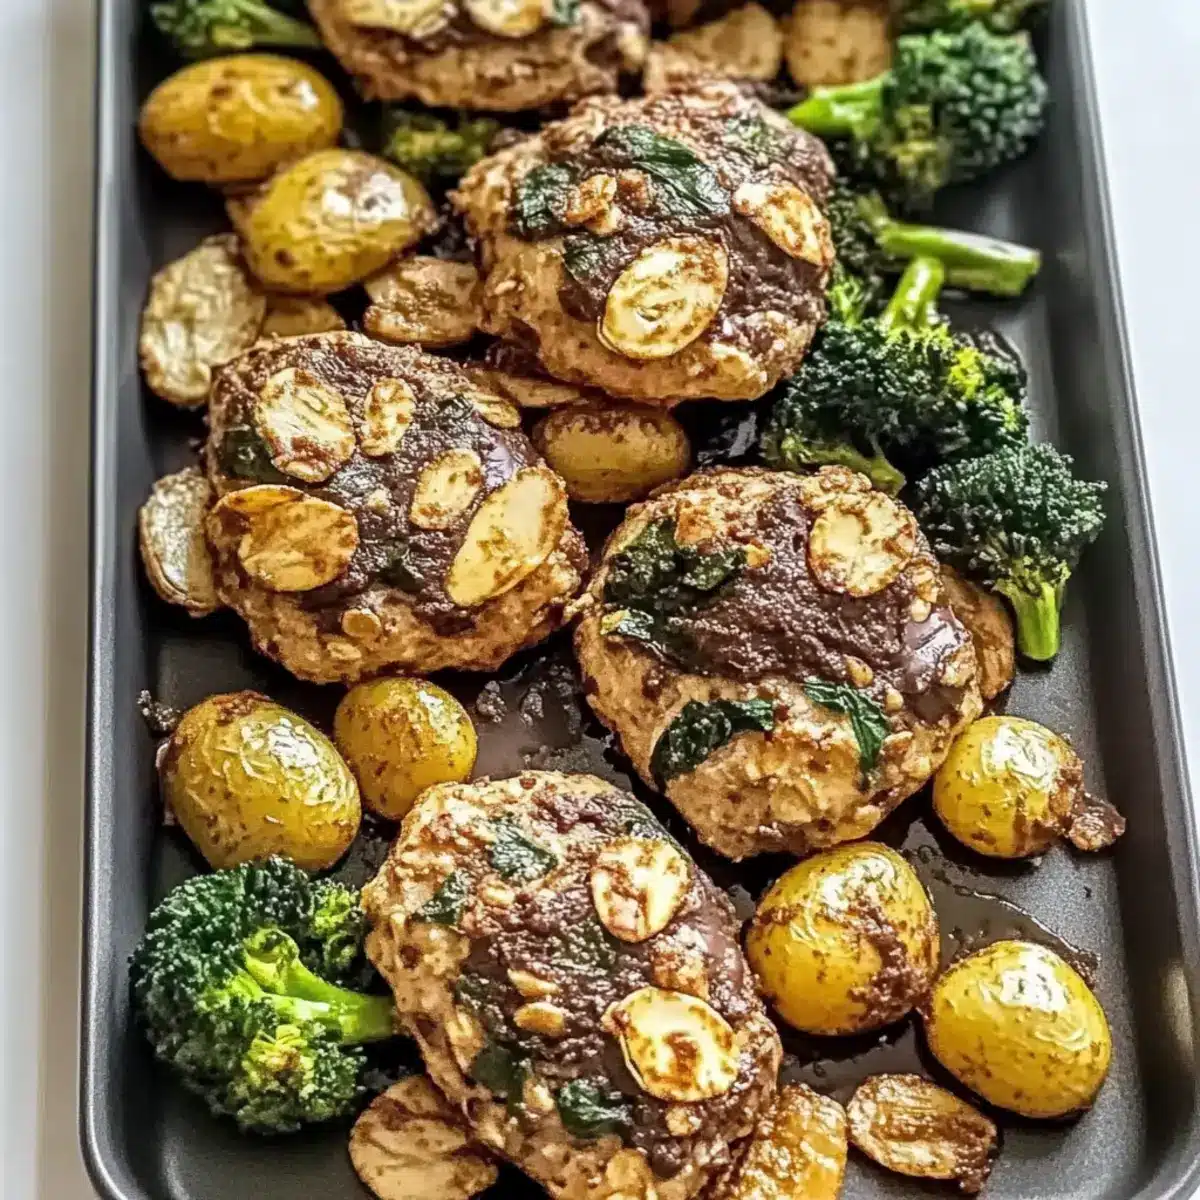
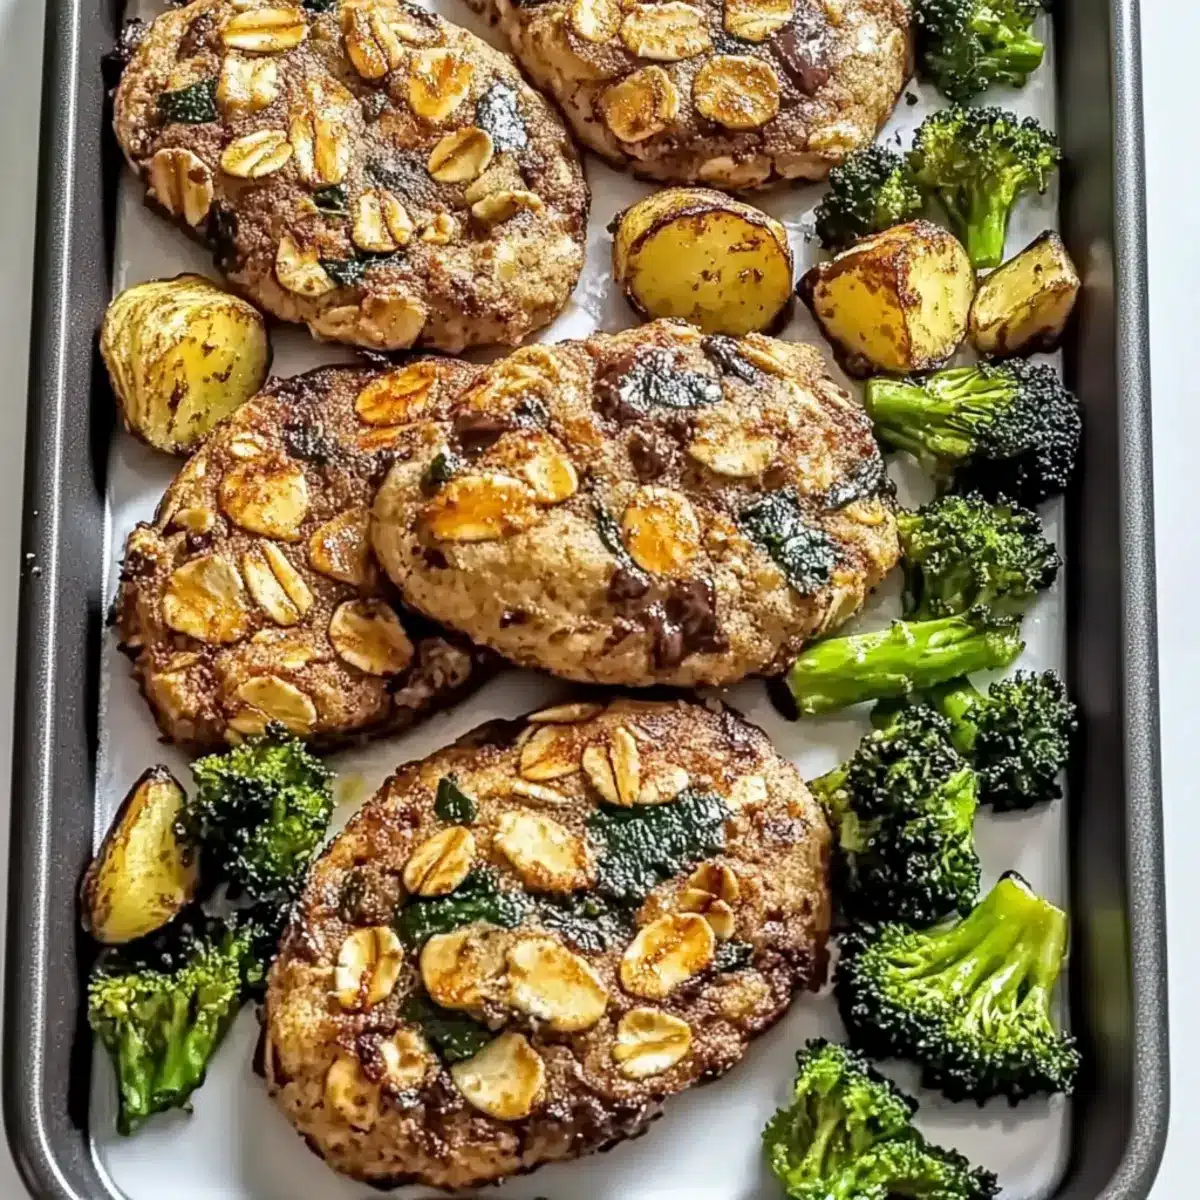
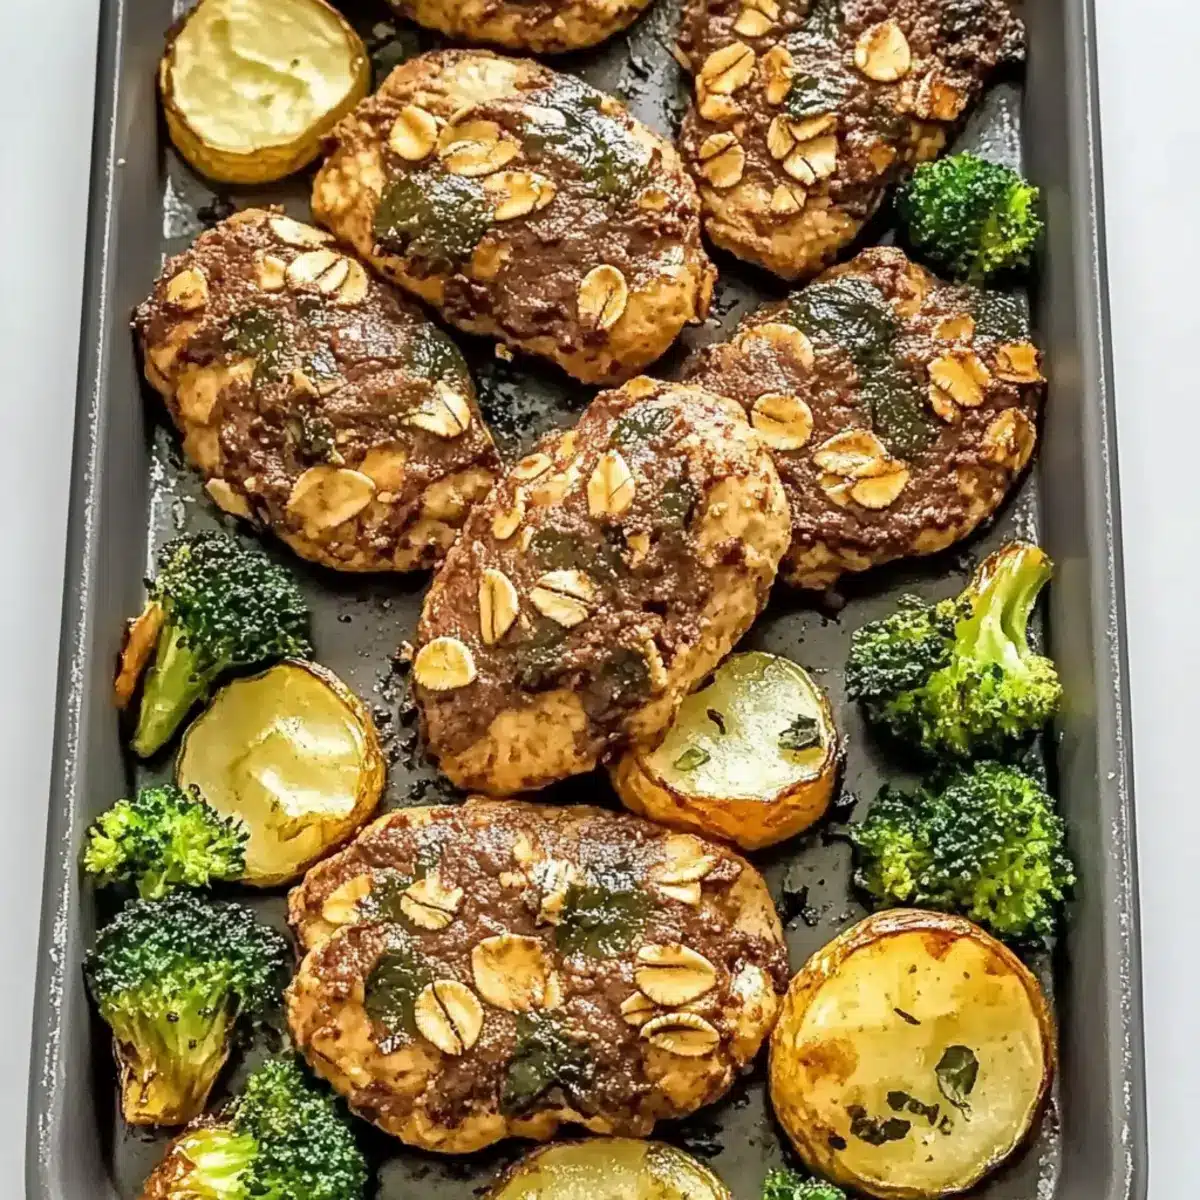
Savory Sheet Pan Garlic Butter Chicken and Veggies Delight
Ingredients
Equipment
Method
- In a large mixing bowl, combine oats and cocoa powder. Stir thoroughly until well blended.
- In a separate bowl, mix together peanut butter and maple syrup until smooth and creamy.
- Pour the wet ingredient mixture into the dry ingredients bowl. Stir well until a cohesive dough forms.
- Using your hands, scoop out tablespoon-sized portions of dough and roll them into balls. Place on a baking sheet lined with parchment paper.
- Gently flatten each ball with your palm to about 1/2 inch thickness.
- Preheat your oven to 350°F (175°C) and bake for 10-12 minutes, until set around the edges.
- Allow the cookies to cool on the baking sheet for 5 minutes before transferring to a wire rack.
Leave a Reply